Pruning
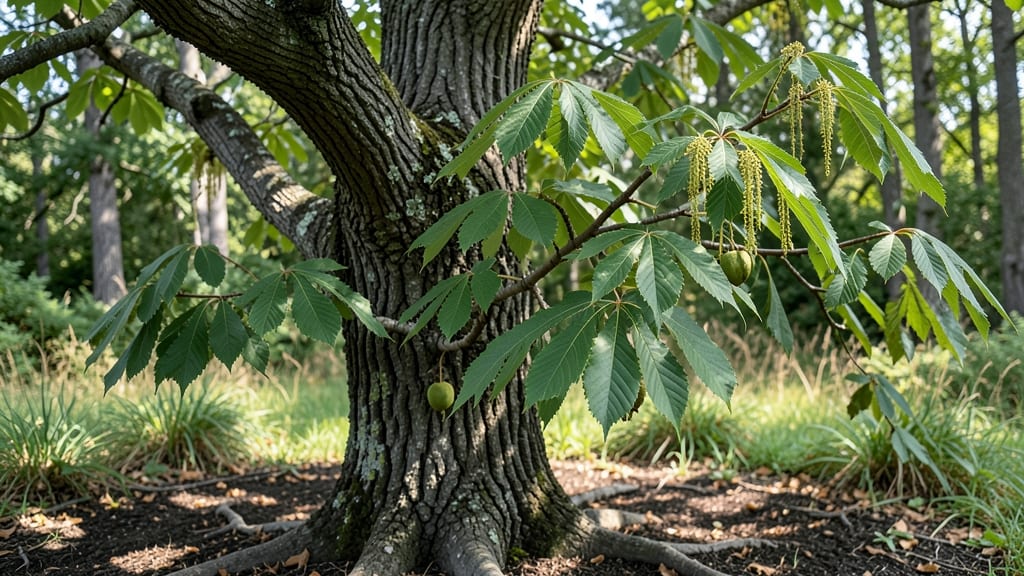
Planting a wild walnut tree (Juglans nigra) is like investing in a frost-resistant giant that grows roots deeper than your shovel can reach. 🌳 I’ve watched mine survive black frost nights while neighbors’ ornamentals wilted—its tough bark and sprawling canopy are nature’s answer to a low-maintenance shade tree.
The real magic? In just five years, it’ll cast shade like a mature oak, all while producing nuts that squirrels and humans both love.
Wild walnuts thrive where cultivated varieties falter: poor soil, rocky ground, or full sun—they’re the tough kids of the tree world. Start with a 1-gallon sapling (nursery-grown beats digging wild seeds) and plant it in early spring when the ground is workable but not soggy.
The first year is all about roots—water deeply once a week unless rain does the job, and skip fertilizer unless your soil tests bone-dry of nutrients. Mulch heavily to keep weeds at bay and moisture locked in.
By year three, you’ll see 5-foot growth spurts if conditions are right, with that signature jagged leaf pattern signaling healthy vigor. The nuts won’t appear until year five or six, but the shade? That’s your reward from day one.
Prune only to shape—never to “control” this tree, or it’ll fight you. Wild walnuts self-prune by dropping weak limbs, leaving you with a sturdy, self-sufficient canopy that outlasts most landscape plants.
Here’s the kicker: these trees improve soil over time, thanks to their allelopathic roots that suppress weeds. Just avoid planting anything delicate nearby—their juglone chemical can stunt neighbors like tomatoes or blackberries. For gardeners with space and patience, a wild walnut isn’t just a tree; it’s a legacy.
Start yours now, and in a decade, you’ll be the one neighbors envy for that shade so thick you’ll need a flashlight at noon.
📚 In This Guide
- What you need
- Instructions
- Tips and common mistakes
- Wrapping up and next steps
What you need
- ● Wild walnut seeds (Juglans spp.) – 5–10 seeds (ensure they’re fresh or cold-stratified for best germination).
- ● Pruning shears – Sharp, bypass-style shears (for clean cuts and disease prevention).
- ○ Grafting tools – Optional but helpful: grafting knife, rubber bands, and grafting tape (if propagating from cuttings).
- ● Organic mulch – 2–3 inches of wood chips or straw (to retain moisture and suppress weeds).
- ● Well-draining soil mix – 50% native soil + 50% compost (walnut trees hate soggy roots!).
- ● Drip irrigation or hose – For consistent watering (walnut trees need deep hydration!).
- ● Stake and twine – 1–2 stakes (for young saplings) and soft twine (to prevent wind damage).
- ● Soil pH test kit – Walnuts prefer slightly acidic soil (pH 6.0–7.0); adjust with lime if needed.
- ● Fertilizer (balanced 10-10-10) – Apply sparingly in early spring (over-fertilizing can harm young trees).
- ● Tree guard or wire mesh – Protects saplings from deer or rodents (common in wild walnut habitats!).
- ● Pruning saw – For thicker branches (once your tree matures in 3–5 years).
- ● Garden gloves – Juglans sap can stain—protect your hands! 🛡️
Step-by-Step instructions for planting and cultivating wild walnut trees
Here's how to establish hardy, frost-resistant wild walnut trees that thrive in your climate.
🌱 Step 1: Choose and Prepare the Planting Site
The wild walnut thrives in well-drained soil with full sun exposure (6+ hours daily). Avoid low spots where water pools—these trees despise soggy roots. I always test drainage by digging a 12-inch deep hole and filling it with water; if it doesn’t drain within 24 hours, amend the soil with 2-3 inches of coarse sand mixed into the top 12 inches of native soil.
Wild walnuts tolerate a wide pH range (5.0-8.0), but they grow fastest in slightly acidic to neutral soil (6.0-7.0). If your soil tests outside this range, incorporate 2-3 pounds of peat moss or composted pine bark per planting hole to adjust pH naturally. The key here is patience—you’re setting the foundation for a tree that will live for decades, so don’t skimp on prep work.
🪴 Step 2: Plant Bare-Root Seedlings at the Right Time
Plant 1-year-old bare-root seedlings in early spring (March-April), just as buds begin to swell but before leaves emerge. This timing ensures the tree establishes roots before summer heat arrives. Dig a hole twice as wide as the root ball but only as deep—burying too deeply suffocates the graft union (if using grafted stock) and encourages rot.
Loosen the roots gently if they’re circling, then place the seedling in the hole so the top of the root ball sits 1-2 inches above ground level. This prevents soil from settling and drowning the stem later. Backfill with native soil, tamping lightly every 3 inches to remove air pockets. Water deeply (5 gallons) immediately after planting to settle the soil and eliminate gaps.
☀️ Step 3: Establish Mulch and Watering Routine for First Year
Spread 3-4 inches of wood chips or straw mulch in a 3-foot diameter ring around the base, keeping it 6 inches away from the trunk to prevent rot. Mulch conserves moisture, suppresses weeds, and regulates soil temperature—critical for young walnuts struggling to establish deep roots. Replenish mulch annually in early spring as it decomposes.
Water deeply once a week during the first growing season, aiming for 10-15 gallons per tree. You’ll know you’ve watered enough when soil 12 inches deep feels uniformly moist. Overhead watering encourages fungal diseases, so use a soaker hose or drip irrigation placed 12 inches from the trunk. Reduce watering in fall as temperatures drop below 50°F to encourage root hardening.
✂️ Step 4: Prune for Structure and Frost Resistance
Prune in late winter (February) before buds swell to remove dead, crossing, or rubbing branches. Use clean, sharp pruners to make cuts just outside the branch collar (the swollen area where the branch meets the trunk). Wild walnuts resprout vigorously, so don’t over-prune—focus on opening the canopy to improve airflow and sunlight penetration, which reduces frost damage.
If a branch breaks under snow or ice, prune it back to a healthy lateral branch. Avoid topping the tree (cutting the main stem)—this triggers weak, frost-sensitive growth. After pruning, apply a dormant oil spray in early spring to smother overwintering pests like scale insects, which can stress young trees.
⏰ Step 5: Monitor for Juglone Toxicity and Nutrient Needs
Wild walnuts produce juglone, a natural toxin that inhibits nearby plants like tomatoes, apples, and blackberries. Plant compatible species (clover, sunflowers, or grasses) within a 50-foot radius to avoid stunted growth in sensitive crops. If you notice yellowing leaves on neighboring plants, it’s your cue to adjust their placement or use raised beds.
Fertilize only if needed—over-fertilizing young walnuts leads to soft, frost-vulnerable growth. In early spring, apply 1/2 cup of 10-10-10 fertilizer spread 12 inches from the trunk and water it in. Skip fertilization if leaves are dark green and vigorous. Wild walnuts are tough; they’ll signal nutrient deficiencies with yellowing between leaf veins (iron deficiency) or purple stems (phosphorus shortage)—address these with targeted amendments.
Tips & tricks for frost-resistant wild walnut tree growth
These practical insights will help you cultivate a thriving wild walnut tree that withstands frost and produces abundant nuts in just five years.
Soil Drainage Test: The 24-hour drainage test in Step 1 is non-negotiable for wild walnut success. If water doesn't drain within this time, your tree will face root rot—especially critical during winter when soggy soil exacerbates frost damage. I've seen walnuts fail spectacularly in poorly drained spots, so take this step seriously. For heavy clay soils, consider building a raised bed or installing drainage tiles beneath the planting hole.
Root Ball Placement: Positioning the root ball just 1-2 inches above ground level in Step 2 prevents what I call "stem suffocation." When soil settles later, the stem won't get buried, which is crucial for frost resistance. This small detail makes all the difference between a tree that survives winter and one that struggles. Mark the planting depth on your shovel handle to ensure consistency.
Mulch Depth Strategy: The 3-4 inches of mulch in Step 3 serves multiple purposes beyond moisture retention. This thickness creates an insulating blanket that protects roots from temperature swings—particularly important during early spring frosts when new growth is vulnerable. I recommend using hardwood chips over straw because they break down more slowly, maintaining insulation longer. Apply mulch after soil temperatures consistently stay above 50°F to prevent rot.
Pruning Timing Nuance: While Step 4 specifies late winter pruning, I've found the optimal window is actually between mid-February and early March when temperatures average 40-45°F. This timing allows the tree to heal cuts before bud break while still removing weak branches that would be frost magnets. Always prune on dry days to minimize disease risk from open wounds.
Pro Tips for Wild Walnut Tree
- These practical insights will help you cultivate a thriving wild walnut tree that withstands frost and produces abundant nuts in just five years.
- Soil Drainage Test: The 24-hour drainage test in Step 1 is non-negotiable for wild walnut success.
- Root Ball Placement: Positioning the root ball just 1-2 inches above ground level in Step 2 prevents what I call "stem suffocation."
Frequently asked questions
Got questions about growing and caring for your wild walnut tree? You’re not alone! Here are answers to the most common queries to help you nurture a thriving, frost-resistant canopy in no time.
How do I know if my wild walnut tree is healthy?
A healthy wild walnut tree has vibrant green leaves (no yellowing or browning), sturdy branches, and a steady growth rate of 1–2 feet per year. Check for no signs of pests like walnut husk fly larvae or fungal spots. If you spot holes in leaves or oozing sap, it may need treatment.
Can wild walnut trees survive harsh winters?
Yes! Wild walnut trees are frost-resistant and thrive in USDA zones 4–9. Young trees benefit from a thick mulch layer (3–4 inches) around the base to protect roots. Prune dead branches in late winter to encourage new growth when spring arrives.
How often should I prune a wild walnut tree?
Prune once a year during late winter or early spring (before buds swell) to remove dead, crossing, or weak branches. Avoid heavy pruning in fall—it stresses the tree. Use sharp, sterilized tools to prevent disease. Pro tip: Never prune more than 25% of the canopy at once!
What can I do if my walnut tree isn’t producing nuts?
Wild walnut trees take 5–10 years to bear nuts. If it’s older and still bare, check for:
- Pollination: Walnut trees need cross-pollination (plant two trees nearby).
- Soil health: Test for nitrogen or phosphorus deficiencies.
- Pests/disease: Inspect for walnut blight or caterpillars.
Are there non-walnut alternatives for shade and frost resistance?
If walnuts aren’t your thing, consider these frost-hardy shade trees:
Tree
Zone
Bonus Feature
Hackberry (Celtis spp.)
3–9
Tolerates urban pollution
Serviceberry (Amelanchier spp.)
4–8
Edible berries + spring blooms
Oak (Quercus spp.)
3–9
Long-lived, acorn production
Wrapping up and next steps
Growing a wild walnut tree is a rewarding journey that blends patience with the joy of nurturing nature’s bounty. With the right frost-resistant variety, proper pruning, and a little dedication, you’ll enjoy a thriving canopy in just five years—plus the delicious harvests and shade it provides! 🌳✨
Ready to take the next step? Start by selecting your sapling and marking your planting spot—your future tree (and future generations) will thank you! Whether you’re a beginner or a seasoned gardener, every cut and care brings you closer to that perfect walnut harvest. Happy growing!