
Pruning
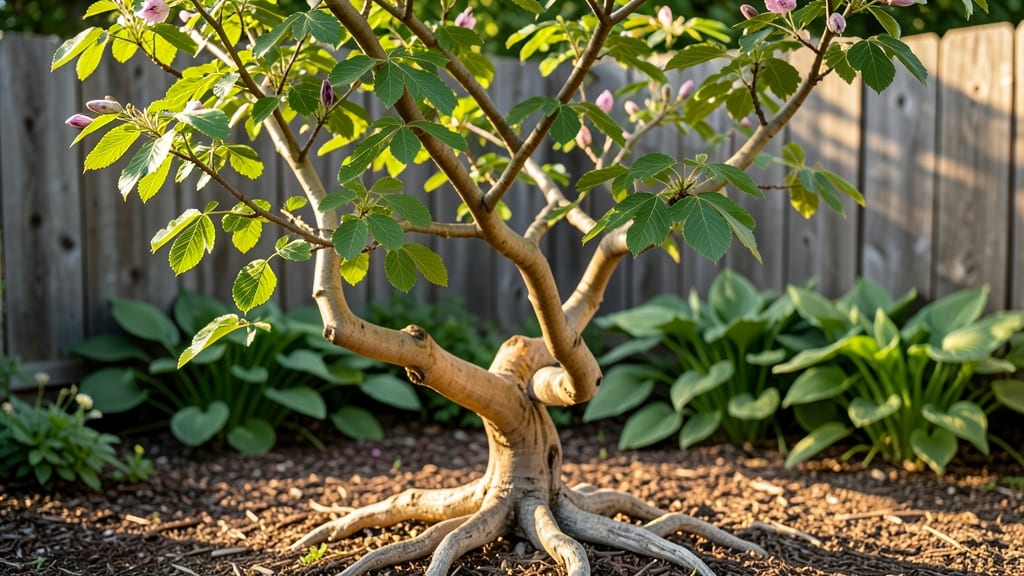
The twisty baby locust tree turns any garden into a living sculpture with its dramatic, spiraling branches—perfect for Pacific Northwest landscapes where it thrives year-round. 🌿 I’ve grown mine for five years through Seattle’s damp winters and scorching summers, and the secret to keeping its signature shape isn’t complicated: it’s all in the pruning.
Most people assume these trees need heavy-handed shaping, but the real magic happens with light, strategic cuts that encourage that natural twistiness without stressing the plant.
This tree loves full sun and tolerates poor soil, making it the foolproof choice for urban yards or rural homesteads. Plant it in well-draining soil with occasional watering once established—overwatering is the fastest way to kill its unique charm.
The key to its ornamental value lies in its year-round structure: even in winter, the bare branches create striking silhouettes against rain clouds.
I’ve seen neighbors mistake it for a bonsai, but with proper care, it grows to a manageable 10–15 feet tall while staying narrow enough for small spaces.
Pruning is where the real transformation happens. In late winter, before new growth starts, I make clean cuts to remove crossing branches—never more than a third of the tree at once. This keeps the twisty habit intact while encouraging dense, healthy foliage.
The result? A tree that looks like it’s been carefully cultivated for decades, not just a few years. By summer, you’ll see fresh green leaves filling out the twists, and by fall, the golden seed pods add another layer of texture.
Works equally well as a standalone specimen or grouped with other ornamental trees. The Pacific Northwest’s mild winters mean you can prune almost year-round, but timing matters—spring and fall are ideal for shaping without shocking the tree.
Start small, and you’ll have a showstopper that turns heads (and maybe even a few jealous glances from neighbors) every season.
📚 In This Guide
- What you need
- Instructions
- Tips and common mistakes
- Wrapping up and next steps
What you need
- ○ Pruning shears: Bypass pruners (for cuts up to ½-inch thick). Optional: Anvil shears for thicker branches (but bypass is gentler on the tree!).
- ● Loppers: 1 pair (for branches ½-inch to 2-inches thick). Pro tip: Choose ratchet-style for easier leverage! 💡
- ● Pruning saw: 1 curved-tooth saw (for branches 2+ inches thick). Spec: 8-10 inches long for precision.
- ● Gloves: Heavy-duty leather gloves (to protect from thorns and sap).
- ● Disinfectant: 70% isopropyl alcohol or a pruning sealant (to prevent disease spread).
- ○ Extension pole: 6-8 feet (for high branches). Optional: Telescoping pole for extra reach.
- ● Twine or zip ties: For temporary branch support during shaping.
- ● Safety glasses: 1 pair (to shield eyes from debris).
- ● Work boots: Sturdy, ankle-supportive (for uneven terrain).
- ● First-aid kit: Bandages, antiseptic wipes, and tweezers (for thorn pricks!).
- ● Trash bags: 2-3 heavy-duty bags (for clippings and debris).
- ● Notebook & pen: To sketch your pruning plan or jot down notes.
- ● Dry, calm day: Avoid pruning after rain or in windy conditions.
- ○ Late winter/early spring: Best time for major cuts (dormant season). Optional: Light shaping in fall (but avoid heavy pruning after August).
- ● Sun protection: Sunscreen, hat, and water bottle (PNW weather can be unpredictable!).
Step-by-Step pruning guide for year-round twisty baby locust structure
Here’s how to shape your locust’s dramatic twists—without sacrificing its health or vigor.
🌿 Step 1: Identify the Tree’s Natural Growth Patterns
Start by examining your locust’s existing structure. Locusts grow in predictable helical spirals, but Pacific Northwest winds often distort them into tighter corkscrews. Look for the dominant central leader—the strongest upward-growing branch—and note where secondary limbs emerge at 30-45° angles. These are your reference points for pruning.
Run your fingers along the trunk and branches to feel where the wood twists most dramatically. These natural curves are what you’ll preserve. Avoid cutting into areas where the bark has already begun to spiral tightly—these are the tree’s own artistic choices, not flaws. Use a 10x hand lens to inspect branch collars for signs of disease or pest damage before making any cuts.
✂️ Step 2: Prune for Structure in Late Winter (Before Bud Break)
The best time to shape your locust is in late February or early March, when the tree is dormant but before buds swell. This timing ensures minimal stress and maximum healing response. Begin by removing any dead, crossing, or rubbing branches—these compete with your desired twists and create weak entry points for disease.
For structural pruning, focus on branches that grow straight up or outward rather than spiraling. Cut these back to a bud facing the direction you want growth to continue. Use sharp, clean shears to make cuts just outside the branch collar. Never leave stubs—this invites decay. If a branch is thicker than 1/3 the trunk diameter, make a three-cut technique to avoid tearing the bark.
☀️ Step 3: Encourage Twists with Summer Thinning Cuts
Mid-summer is when your locust’s twists become most visible. In July or August, assess the tree’s new growth. Look for areas where branches have grown too densely or where the spiral has loosened. Thin these out by removing 1-2 branches per cluster, prioritizing those that grow inward or upward.
Here’s the trick: When you remove a branch, you’re not just reducing density—you’re redirecting energy to the remaining twists. After each cut, step back and visualize the tree’s final shape. The goal is to create a balanced spiral where no single branch dominates. Avoid heavy pruning in summer—locusts heal slower in heat, and over-pruning can stress the tree into producing weak, leggy growth.
🪴 Step 4: Maintain Year-Round with Light Trims
Throughout the year, perform light maintenance prunes to keep the tree’s structure clean. Remove any suckers (shoots growing from the base or roots) immediately—they drain energy from your desired twists. In early spring, check for water sprouts (fast-growing vertical shoots) and prune them back to a lateral bud.
After storms or high winds, inspect the tree for broken branches. If a branch snaps cleanly, you can often save it by making a clean cut at the branch collar. If the break is jagged, smooth the edges with a pruning knife to prevent tearing. Locusts are resilient, but even they benefit from prompt attention to wounds. Seal larger cuts with pruning sealant only if the diameter exceeds 2 inches—smaller cuts heal better when left open to air.
Tips & tricks for perfect twisty baby locust structure
Real talk: Pruning a locust for dramatic twists isn't just about cutting branches—it's about understanding how the tree naturally grows and working with its rhythm. Here's how to elevate your pruning game without stressing the tree.
Visualize the Spiral First: Before you make any cuts, step back and trace the tree's natural twists with your eyes. The goal is to enhance what's already there, not force a new shape. I've found that marking the dominant spiral with a piece of twine helps me see the pattern more clearly—it becomes your guide for where to thin and where to preserve. In Step 1, when you're identifying growth patterns, this visualization prevents you from accidentally cutting into the most dramatic curves.
Seasonal Timing is Everything: The late February-March window in Step 2 isn't just arbitrary—it's when locusts are most resilient to pruning. The tree's sap flow is minimal, so cuts heal faster. Here's what nobody tells you: If you must prune outside this window, do it on a cool, cloudy day in summer (Step 3) to reduce stress. Warm, sunny days cause the tree to lose more moisture through the fresh cuts, which can weaken the structure you're trying to create.
Precision Over Speed: When making cuts in Step 2 or Step 3, take your time with branches thicker than 1/3 the trunk diameter. The three-cut technique isn't just about preventing bark tearing—it's about maintaining the tree's natural energy flow. Make your first cut about 1/3 of the way through the branch from below, then 1/3 from above, and finally sever it cleanly. This method also gives you better control over the direction of the remaining growth, which is crucial for maintaining those twists.
Post-Pruning Care: After any significant pruning, give your locust a good drink of water. The tree will need to recover from the stress, and proper hydration helps the remaining branches establish themselves. In Step 4, when dealing with storm damage, I've noticed that applying a thin layer of pruning sealant to jagged cuts actually slows healing—only use it on wounds larger than 2 inches, as the instructions specify, to prevent moisture buildup that can lead to rot.
Pro Tips for Twisty Baby Locust Tree
- Real talk: Pruning a locust for dramatic twists isn't just about cutting branches—it's about understanding how the tree naturally grows and working with its rhythm.
- Visualize the Spiral First: Before you make any cuts, step back and trace the tree's natural twists with your eyes.
- Seasonal Timing is Everything: The late February-March window in Step 2 isn't just arbitrary—it's when locusts are most resilient to pruning.
Frequently asked questions
Got questions about pruning your twisty baby locust tree? You’re not alone!
Here are some of the most common queries from Pacific Northwest gardeners—plus practical answers to keep your tree thriving year-round.
What’s the best time of year to prune a twisty baby locust tree?
For optimal structure, prune in late winter or early spring (February–March) before new growth starts. This timing encourages strong branching while minimizing stress. Avoid heavy pruning in summer or fall, as it can weaken the tree or invite pests. Learn more about seasonal timing.
How much can I trim without harming the tree?
Never remove more than 25% of the tree’s foliage in one session. Twisty baby locusts are resilient, but aggressive pruning can stress the tree or disrupt its natural twisty form. Focus on selective cuts—target dead, crossing, or overcrowded branches first. For mature trees, spread pruning over 2–3 years.
Will pruning affect the tree’s iconic twisty shape?
Absolutely—pruning is what defines it! The twisty form comes from strategic cuts that encourage spiral growth. Avoid pruning randomly; instead, follow the tree’s natural curves. If you’re unsure, start with light shaping in early spring and observe how it responds before making bold changes.
Are there alternatives if my locust tree isn’t thriving after pruning?
If your tree shows yellowing leaves, stunted growth, or dieback, it may need more than pruning. Check for:
- Pests (e.g., locust borers—look for sawdust-like frass).
- Soil issues (compacted or poor drainage).
- Overwatering (locusts prefer well-draining soil).
Do I need to prune in winter if it’s cold in the PNW?
Yes! Dormant pruning (Dec–Feb) is ideal for the PNW’s chilly winters. Cold weather reduces stress, and the tree’s energy is conserved until spring. Just avoid pruning during hard freezes (below 20°F), as brittle wood can snap. Wear gloves—locust thorns are no joke!
Wrapping up and next steps
The twisty baby locust tree is a stunning addition to any Pacific Northwest garden, offering year-round structure and unique charm with the right pruning techniques.
By mastering the art of selective cuts, seasonal shaping, and safety measures, you can cultivate a tree that thrives while staying true to its natural beauty. 🌿
Now that you’re equipped with the know-how, roll up your sleeves and get pruning! Start small—maybe with just one branch this weekend—and watch your tree transform over time. Before you know it, you’ll have a showstopper that neighbors will envy. Happy pruning! 🌟