Trees
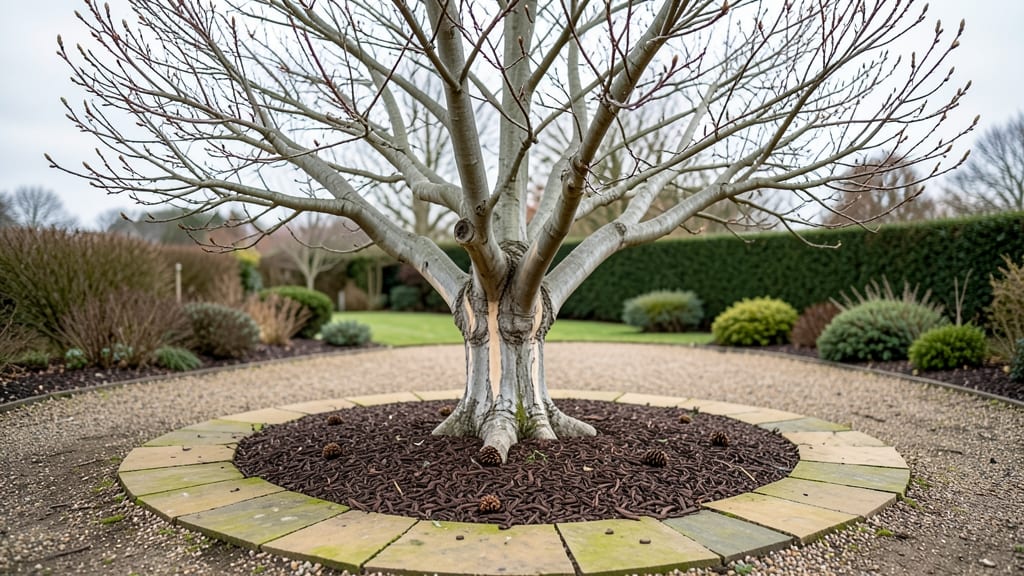
Paving stones around trees aren't just about pretty pathways—they’re a lifeline for your canopy’s health. ✨ I learned this the hard way when my favorite oak’s roots got crushed under heavy foot traffic, leaving brown patches in its wake.
The right stonework keeps roots breathing while creating a polished look that ties your landscape together.
Start with 3- to 4-inch-wide stones spaced 1-2 inches apart for drainage, and always keep them 6-12 inches away from the trunk to avoid girdling. Use permeable pavers or gravel-filled gaps to let rainwater seep down to roots.
Pair them with 2-3 inches of mulch in the tree ring to lock in moisture and block weeds—just keep mulch clear of the trunk.
You’ll end up with a pathway that’s both functional and beautiful, where rainwater flows instead of pooling, and your tree’s roots stay happy. The stones add structure to your garden while keeping the soil cool and moist—exactly what mature trees need to thrive.
Plus, you can add solar-powered path lights or low-growing ground covers like creeping thyme for extra charm.
Works for any tree size, from young saplings to century-old oaks. The key is balancing aesthetics with root protection—no more cracked sidewalks or stressed canopies. Ready to get started?
📚 In This Guide
- What you need
- Instructions
- Tips and common mistakes
- Wrapping up and next steps
What you need
- ● Paving stones: 10–20 stones (depending on tree size), 4"–6" thick, with perforated or interlocking designs for drainage.
- ● Landscape fabric: 1 roll (12' x 10') to protect roots and prevent weed growth.
- ● Crushed gravel or sand: 2–3 bags (50 lbs each) for a stable base (use coarse gravel for drainage).
- ○ Tree root barrier (optional): 1–2 rolls (6"–12" tall) to direct roots downward and away from the path.
- ● Shovel or spade: For digging trenches and moving soil.
- ● Wheelbarrow or tarp: To haul gravel, sand, or debris.
- ● Rubber mallet: For gently tapping stones into place.
- ● Level or straightedge: To ensure your path stays even and stable.
- ● Measuring tape & string: For marking the pathway’s width and shape.
- ● Knee pads or gloves: Because comfort (and clean hands!) matter.
- ● Edging restraints: Metal or plastic strips to keep stones in place.
- ● Decorative border stones: For a polished look (e.g., brick or cobblestone accents).
- ● Mulch or bark chips: To blend the path into the landscape naturally.
- ● Weed killer (pre-applied): If your area is prone to invasive plants.
Step-by-Step instructions for installing paving stones around trees
Here's how to create a root-friendly pathway that keeps your tree thriving while adding beauty to your landscape.
🪴 Step 1: Measure and Mark the Pathway Layout
Start by measuring the area around your tree where you want the pathway. Use a 12-inch minimum clearance from the trunk to protect roots—this prevents soil compaction and root damage. Mark the layout with spray paint or stakes, keeping the path at least 3 feet wide for comfortable walking and maintenance access.
For curved pathways, use a garden hose to create smooth lines before marking. Step back frequently to visualize how the stones will fit between the tree and surrounding landscape. Remember, wider paths require more stones, but they also make future maintenance easier.
💧 Step 2: Excavate and Prepare the Base
Dig down 4-6 inches along your marked path, removing only the top layer of soil while leaving the subsoil intact. This depth allows for proper drainage while keeping the tree's root zone undisturbed. Use a shovel to create a slight slope (about 1 inch per foot) away from the tree to direct water runoff.
Compact the subsoil base with a hand tamper or plate compactor. This prevents future settling and ensures the stones stay level. For clay-heavy soils, spread a 2-inch layer of coarse sand over the base before compacting—this improves drainage and prevents water pooling near the tree roots.
☀️ Step 3: Install Edge Restraints and Base Material
Install flexible plastic or metal edging along the path's perimeter to contain the stones and prevent them from shifting into the lawn or garden bed. Cut the edging to fit snugly around the tree trunk, leaving enough space for root flare visibility. For the base, spread a 2-inch layer of crushed gravel (¼-inch to ½-inch size) over the compacted soil.
Use a rake to level the gravel evenly, ensuring it slopes away from the tree. This layer provides drainage and prevents soil from washing under the stones during rain. For paths near large trees, consider adding a geotextile fabric between the soil and gravel to further protect roots from compaction.
✂️ Step 4: Lay the Paving Stones with Root Protection in Mind
Start laying the paving stones at the tree's base, working outward. Leave a 2-inch gap between the stones and the trunk to allow air circulation and prevent moisture buildup against the bark. Use a rubber mallet to tap stones into place, ensuring they sit flush with the surrounding path.
For pathways wider than 3 feet, use a saw-cut pattern to create joints that allow for slight movement and reduce cracking. Fill the gaps between stones with polymeric sand (not regular sand) to lock them in place and prevent weed growth. Avoid compacting the sand—just sweep it into the joints for a secure fit.
🌿 Step 5: Add Mulch and Final Touches for Tree Health
After the stones are set, create a 2-inch-thick mulch ring around the tree's drip line (the edge of the canopy) using shredded bark or wood chips. Keep the mulch 6 inches away from the trunk to prevent moisture retention against the bark. This mulch layer protects roots from temperature extremes and retains soil moisture.
Water the tree deeply after installation to settle the soil and encourage root growth into the undisturbed areas. Avoid walking on the new pathway for 48 hours to let the sand and gravel settle properly. Over time, check for shifting stones and add more polymeric sand as needed to maintain stability.
Tips & tricks for perfect tree-friendly pathways
Here's what I've learned after installing pathways around mature trees without damaging a single root.
Root Clearance is Non-Negotiable: That 12-inch minimum clearance from the trunk in Step 1 isn't just a suggestion—it's the difference between a thriving tree and one struggling from root restriction. I've seen pathways installed too close that actually caused girdling over time. For young trees, you can extend this to 18 inches to give roots room to grow outward. Remember, roots spread horizontally, not vertically!
Soil Slope Secret: When creating that 1 inch per foot slope in Step 2, think of it as your drainage highway. Water should flow away from the tree, not pool near it. I use a level and a straight board to check the slope—if water pools after rain, you'll know you need to adjust. For clay soils, adding that 2-inch sand layer before compacting makes all the difference in preventing waterlogging near roots.
Edging Precision: In Step 3, cutting the edging too tightly around the trunk can actually damage the root flare—the swollen area where roots meet the trunk. Leave enough room to see the flare's natural shape. I like to use flexible plastic edging because it conforms to curves better than metal, and it won't crack when the ground shifts slightly over time.
Stone Placement Strategy: That 2-inch gap between stones and trunk in Step 4 isn't just for looks—it creates an air gap that prevents moisture buildup against the bark, which can lead to rot. For the saw-cut pattern in wider paths, I recommend using a wet saw with a diamond blade to get clean cuts that won't chip. The polymeric sand is worth every penny—regular sand washes away in the first rain!
Pro Tips for Paving Stones Around Trees
- Here's what I've learned after installing pathways around mature trees without damaging a single root.
- Root Clearance is Non-Negotiable: That 12-inch minimum clearance from the trunk in Step 1 isn't just a suggestion—it'...
- Soil Slope Secret: When creating that 1 inch per foot slope in Step 2, think of it as your drainage highway. Water sh...
Frequently asked questions
Got questions about paving stones around trees? You’re not alone—this project blends aesthetics with practicality! Here are answers to the most common concerns to help you plan like a pro.
What’s the best spacing between paving stones and tree roots?
Leave at least 12–18 inches of space between the edge of the paving stones and the tree trunk (or root flare). This prevents root damage while allowing airflow and moisture to reach the roots. For large trees, widen the gap to 24+ inches—roots can spread far!
When is the best time to install paving stones around a tree?
Spring or fall are ideal! Avoid winter (frozen ground) or peak summer (drought stress). If you must install in summer, water the tree deeply before and after to minimize shock. For newly planted trees, wait 1–2 years to let roots establish.
Are there cheaper alternatives to paving stones?
Yes! Consider:
- Gravel or mulch: Budget-friendly and permeable, but may shift over time.
- Decomposed granite: A mid-range option that blends with natural landscapes.
- Permeable pavers: Let water seep through while offering durability.
How do I fix paving stones that are sinking or uneven?
Sinking stones signal poor drainage or settling soil. Lift the stones, add 1–2 inches of compacted gravel or sand, then re-level. For severe cases, check for root intrusion—gently prune any roots pushing up through the stones. Re-secure with landscape adhesive if needed.
Will paving stones harm my tree’s roots in the long run?
Not if installed correctly! The key is permeability—use stones with gaps or permeable bases to allow water and oxygen to reach roots. Avoid sealing joints with non-porous materials (like asphalt). Monitor for yellowing leaves or stunted growth, which may signal root stress.
Still stumped? Drop your question in the comments—we’re happy to help your tree (and your project) thrive!
Wrapping up and next steps
Paving stones around trees aren’t just about aesthetics—they’re a lifeline for your canopy! By choosing the right materials, spacing, and techniques, you protect roots, prevent soil compaction, and even boost drainage.
Whether you’re a DIY enthusiast or a seasoned landscaper, this guide gives you the confidence to create pathways that both enhance your yard and keep your trees thriving.
Ready to transform your outdoor space? Grab your tools, pick your stones, and start planning your root-friendly pathways today! 🌳✨ Your trees—and your curb appeal—will thank you.