
Pruning
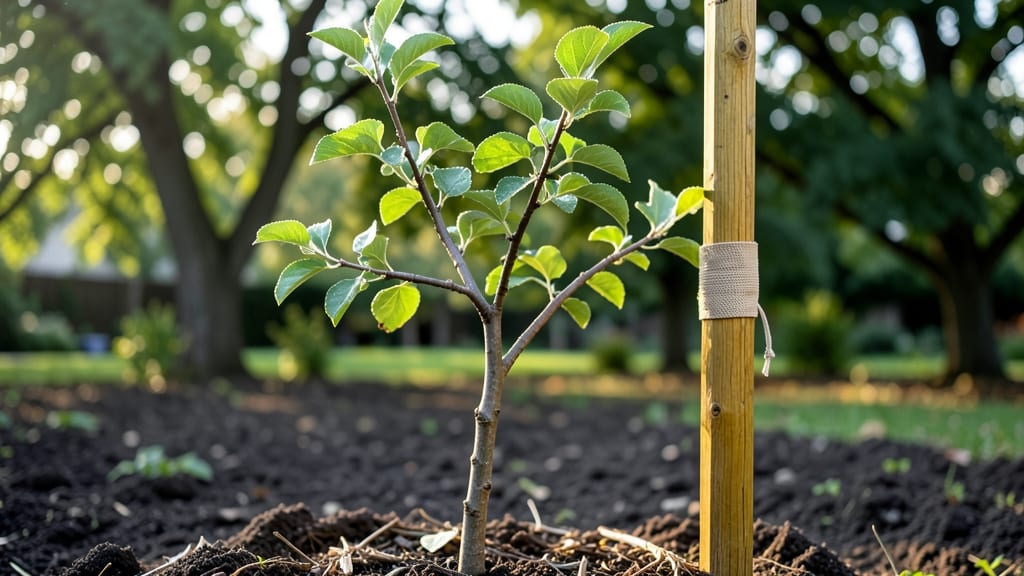
Learn how to stake a tree without damaging it so it thrives—soft ties, proper spacing, and breathable materials let young trees stand strong without scarring their trunks or roots. 🌳 The key is balance: enough support to prevent swaying, but loose enough to let the tree develop its own strength.
You’ll need just a few supplies: 2-3 stakes (wooden or plastic, not metal), wide fabric strips or tree ties, and a mallet for gentle driving. Avoid wire or anything that can cut into bark—even a loose tie can girdle the trunk over time if left too tight.
The stakes should go 6-12 inches from the trunk, angled slightly outward to mimic natural wind resistance.
When done right, your tree will grow straight and sturdy, its trunk thickening naturally as it learns to stand on its own. The ties should be snug enough to prevent flopping but loose enough to slide two fingers between the trunk and the strap.
Check them every few weeks—trees grow fast, and what felt secure last month might be too tight now.
Most trees only need stakes for 1-2 years, until their root systems catch up to their tops. Remove them gradually to avoid shocking the tree, and always stake in spring or early summer—never in winter, when cold winds are the least of its concerns.
Here’s how to do it without leaving a single scar.
📚 In This Guide
- What you need
- Instructions
- Tips and common mistakes
- Wrapping up and next steps
What you need
- ● Stakes: 2–4 thin, flexible stakes (1–1.5 inches in diameter) per tree, depending on size. Avoid thick, rigid stakes—they can crush bark.
- ● Length: Slightly taller than the tree’s height (e.g., 4–6 feet for a 3-foot sapling).
- ● Tree Tie or Strap: Soft, breathable fabric ties (e.g., blank">Tree Tether or blank">plastic-coated nylon webbing), not wire or metal.
- ● Width: At least 1–2 inches to prevent digging into the bark.
- ● Gloves: Sturdy gardening gloves to protect your hands from splinters or rough bark.
- ○ Shovel or Spade: For digging small holes to secure stakes (optional if using T-posts or pre-installed stakes).
- ● Measuring Tape: To ensure stakes are the right height and ties are snug but not tight.
- ● Stake Drivers or Mallet: To gently hammer stakes into the ground without damaging the tree’s roots.
- ● Bark Protector: A rubber or foam sleeve to wrap around the trunk where the tie touches (prevents abrasions).
- ● Watering Can: To hydrate the tree post-staking (stress from staking can dehydrate young trees).
- ● Pruning Shears: For trimming any damaged branches before staking.
- ● Mulch: Organic mulch (e.g., wood chips) to protect the root zone after staking.
Step-by-Step instructions for staking a tree without damaging it
Here's how I support young trees so they grow strong—not weak—from the start.
🌱 Step 1: Choose the Right Stakes and Tie Materials
Use flexible, wide stakes (3/4-inch to 1-inch diameter) made of wood or plastic, positioned at a 45-degree angle away from the prevailing wind. I avoid metal stakes—they can damage bark over time. For ties, use soft, stretchy materials like tree tie straps, old pantyhose, or even strips of old T-shirt fabric. Never use wire or anything that can cut into the trunk as it grows.
Here's the thing—you want the stakes to be sturdy enough to hold the tree steady but gentle enough to let the trunk sway slightly in the wind. This movement actually strengthens the trunk over time. I like to use two stakes per tree, one on either side of the trunk, about 1/3 of the tree's height above the ground. This gives the tree enough support without restricting its natural movement.
🪴 Step 2: Position Stakes and Prepare the Tree
Dig a small hole near the tree—about 6-8 inches deep—and insert the first stake at a 45-degree angle, tilting it away from the wind. The top of the stake should be above the tree’s height to provide leverage. Repeat on the opposite side. Make sure the stakes are at least 6 inches away from the trunk to avoid root damage.
Before attaching anything to the tree, I give the trunk a gentle inspection. Look for any rough spots or areas where the bark might be thin. These are the spots you’ll want to avoid when tying. I also make sure the tree is perfectly upright—if it’s leaning, I’ll adjust the stakes to help guide it straight without forcing it. The goal is to support, not correct.
💧 Step 3: Secure the Tree with Gentle, Adjustable Ties
Wrap the tie material around the trunk first, leaving a small gap (about 1/4 inch) between the tree and the tie. This prevents any rubbing or constriction. Then, loop the tie around the stake and secure it with a bow or knot—never a tight loop that could tighten over time. I like to use two ties per stake, spaced about 6 inches apart vertically, to distribute the pressure evenly.
This is the moment that matters: the ties should hold the tree steady but still allow it to sway a little. You’ll know it’s right if the tree doesn’t feel like it’s being strangled. I always double-check by giving the tree a slight push—if it moves back into place but doesn’t feel restricted, you’re good to go. If a tie feels too tight, loosen it immediately. Tight ties can girdle the trunk as it grows, which is a common mistake that stunts growth.
✂️ Step 4: Monitor and Adjust Over Time
Check the stakes and ties every 4-6 weeks to make sure they’re still secure but not too tight. Trees grow surprisingly fast, and what felt snug last month might be cutting into the trunk now. I always adjust the ties as needed, especially during windy seasons. If the tree starts to outgrow its stakes, it’s time to remove them—usually after 1-2 years, depending on the species and how well it’s established.
Real talk: I’ve seen trees with stakes left in for years, and the damage is often visible—deep grooves in the bark where ties were too tight. The key is to remove stakes as soon as the tree can stand on its own. You’ll know it’s ready when the trunk is thick enough to sway without falling over. This usually happens when the trunk is about 1 inch in diameter at the base. Don’t rush it, but don’t let the stakes become a crutch either.
Tips & tricks for perfect tree staking without damage
These simple adjustments will help you avoid common mistakes and ensure your young tree grows strong and healthy.
Stake Placement Precision: When positioning your 3/4-inch to 1-inch diameter stakes in Step 1, make sure they're inserted at a 45-degree angle away from the prevailing wind. I've found that using a small level or even a smartphone app can help you achieve this exact angle—it makes all the difference in how effectively the stakes will support the tree. The top of each stake should extend above the tree's height to provide maximum leverage without looking awkward.
Tree Inspection Tip: Before you even think about tying, take a close look at the trunk in Step 2. Run your fingers gently along the bark—you'll often find rough spots or areas where the bark is thinner. These are the spots to avoid when tying. I've learned the hard way that even the gentlest tie can cause damage if placed over these vulnerable areas. A quick inspection now can save you from potential problems later.
Tie Tension Technique: In Step 3, when you're wrapping your ties, leave that crucial 1/4-inch gap between the trunk and the tie material. This small space prevents any rubbing that could damage the bark as the tree grows. I like to use a business card as a guide—its thickness matches that perfect gap. Also, remember to use a bow or knot rather than a tight loop that could tighten over time and restrict growth.
Growth Monitoring: The 4-6 week check mentioned in Step 4 is non-negotiable. I've seen many trees where the ties became too tight over time, leaving permanent grooves in the bark. During each check, gently slide your fingers between the tie and the trunk—you should be able to fit a fingernail in that space. If you can't, it's time to loosen that tie immediately. This simple check can prevent years of damage.
Pro Tips for Stake A Tree Without Damaging It
- These simple adjustments will help you avoid common mistakes and ensure your young tree grows strong and healthy.
- Stake Placement Precision: When positioning your 3/4-inch to 1-inch diameter stakes in Step 1, make sure they're inserted at a 45-degree angle away from the prevailing wind.
- Tree Inspection Tip: Before you even think about tying, take a close look at the trunk in Step 2.
Frequently asked questions
Got questions about staking trees the right way? You’re not alone!
Here are answers to the most common concerns—so you can support your tree without causing harm.
When is the best time to stake a young tree?
Stake a tree immediately after planting if it’s top-heavy, in windy areas, or has shallow roots. For most species, this means spring or early fall—avoid extreme heat or frost. If your tree is already established (1–2 years old), staking is rarely needed unless it’s leaning dangerously.
How do I know if my tree still needs stakes after a few months?
Check for stability by gently pushing the trunk at the base. If it doesn’t wobble more than 1–2 inches, remove the stakes! Over-staking can weaken roots by preventing natural movement. Look for signs of strain, like bent stakes or loose ties—these mean it’s time to reassess.
Can I reuse stakes from last year’s tree?
Reusing stakes is fine if they’re in good condition—no splinters, cracks, or warping. However, avoid using treated wood (like pressure-treated lumber), as chemicals can harm the tree. Plastic or bamboo stakes are safer long-term. Always sanitize with a bleach solution (1 part bleach to 9 parts water) if reusing.
What should I do if my tree’s bark is getting damaged by the stake or tie?
This is a red flag! Stop using the stake immediately and loosen or replace the tie with a softer material (like rubber tree ties or old pantyhose). If the bark is already injured, gently scrape away damaged areas and apply pruning sealant (optional for small wounds). Monitor the tree closely for signs of disease.
Are there alternatives to traditional staking for small or delicate trees?
For lightweight trees (like fruit trees or ornamentals), try:
- Burlap wraps: Secure the trunk with soft burlap tied loosely to a nearby stake.
- Wire cages: Bend flexible wire into a cage around the tree for support.
- No stakes at all: Mound soil at the base to create a “root ball” for stability (works for trees with strong root systems).
Wrapping up and next steps
Staking a tree the right way ensures it grows strong and healthy while avoiding unnecessary stress or damage.
By choosing the right materials, using gentle techniques, and monitoring progress, you can support your young tree without compromising its natural stability. Now that you’re ready to take action, grab your tools and give your tree the care it deserves!
🌱 Pro tip: Check on your tree regularly—once it’s established, you can remove stakes to encourage independence!